
If you’re dreaming of longer, fuller hair but don’t want the commitment of permanent extensions, clip-in hair extensions are your best bet. They’re versatile, easy to apply, and can instantly transform your hairstyle. Here’s a simple guide to adding clip-in hair extensions seamlessly, so you can enjoy gorgeous locks without a salon visit.
What Are Clip-In Hair Extensions?
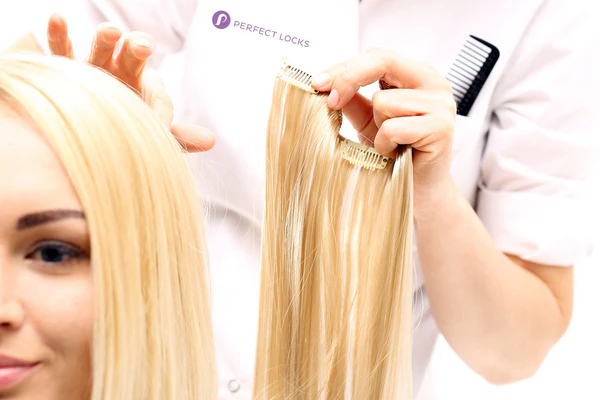
Clip-in hair extensions are a popular choice for those who want to change up their look without making a long-term commitment. These extensions come with small clips sewn into them, allowing you to easily attach and remove them as needed. They’re available in various lengths, colors, and textures, making it easy to match them to your natural hair.
Choosing the Right Clip-In Extensions
- Color Match: When selecting clip in hair extensions, it’s crucial to choose a color that closely matches your natural hair. Most brands offer a wide range of shades, and some even have color-matching tools online to help you find the perfect match.
- Length and Volume: Consider how much length and volume you want to add. Clip-in extensions come in different lengths, so choose one that will blend well with your natural hair.
- Texture: Hair extensions come in various textures, including straight, wavy, and curly. Select a texture that matches your natural hair to ensure a seamless blend.
Preparing Your Hair
Before applying your clip-in hair extensions, prepare your natural hair for a flawless application:
- Wash and Condition: Clean and condition your hair to ensure it’s free from oils and product buildup. This helps the extensions blend better.
- Dry and Style: Dry your hair completely before applying the extensions. For a more seamless look, style your hair in the same way you plan to wear the extensions.
- Brush Thoroughly: Use a wide-tooth comb or brush to detangle your hair. Smooth, knot-free hair helps the extensions blend more naturally.
Applying Clip-In Hair Extensions
- Section Your Hair: Start by sectioning your hair into layers. Use clips or hair ties to keep each section separate. Begin with the lower layers and work your way up.
- Attach the Extensions: Take the first section of hair and clip in the extension. Start at the root of your hair and secure the clip-in extension by pressing the clips into place. Make sure the clips are close to the roots without pulling or causing discomfort.
- Blend and Style: Once all extensions are in place, gently brush through your hair to blend the extensions with your natural hair. Style as desired to create a cohesive look.
- Check for Secure Fit: Ensure all clips are securely fastened and that the extensions feel comfortable. Make any necessary adjustments to avoid visible clips or uneven blending.
Caring for Your Clip-In Hair Extensions
To extend the life of your clip-in hair extensions and keep them looking their best:
- Regular Cleaning: Wash your extensions every 8-10 wears or as needed. Use a gentle shampoo and conditioner, and avoid overwashing.
- Proper Storage: Store your extensions in a cool, dry place. Use a hanger or a storage bag to keep them tangle-free.
- Avoid Heat: Minimize heat styling to preserve the integrity of the extensions. If you must use heat, always use a heat protectant.
Removing Clip-In Extensions
At the end of the day or when you’re ready to switch up your look, removing clip-in extensions is simple:
- Gently Unclip: Carefully unclip each extension, starting from the top layer and working your way down.
- Brush and Store: Brush through the extensions to remove any tangles before storing them properly.
By following these steps, you can easily add clip-in hair extensions for a natural and stunning look. Whether you’re preparing for a special occasion or just want to switch up your everyday style, clip-in extensions offer a flexible and fun way to enhance your hair.